Category Archives: Recipes

Mamma’s Marvelous Minestrone (Gluten Free or Gluten Full)

Minestrone Cooking on the Stove, smells gooooood!
  1. one to two onions (yellow) chopped medium to small
  2. 1/4 or so of really good olive oil. I buy Henry’s Olive Oil in five gallon buckets and selectively share it with others, but I go through five gallons pretty regularly. Whatever good olive oil you have locally, use that. Heavy, dark and green, not light and clear!
  3. three to four good carrots, not wimpy, limpy ones, cut into small halves or quarters (the smaller you chop something the more flavor you get, due to surface area being exposed. See The Ten Commandments of Nicole’s Kitchen
  4. two to four thin small zucchinis, I never use big fat ones for this recipe
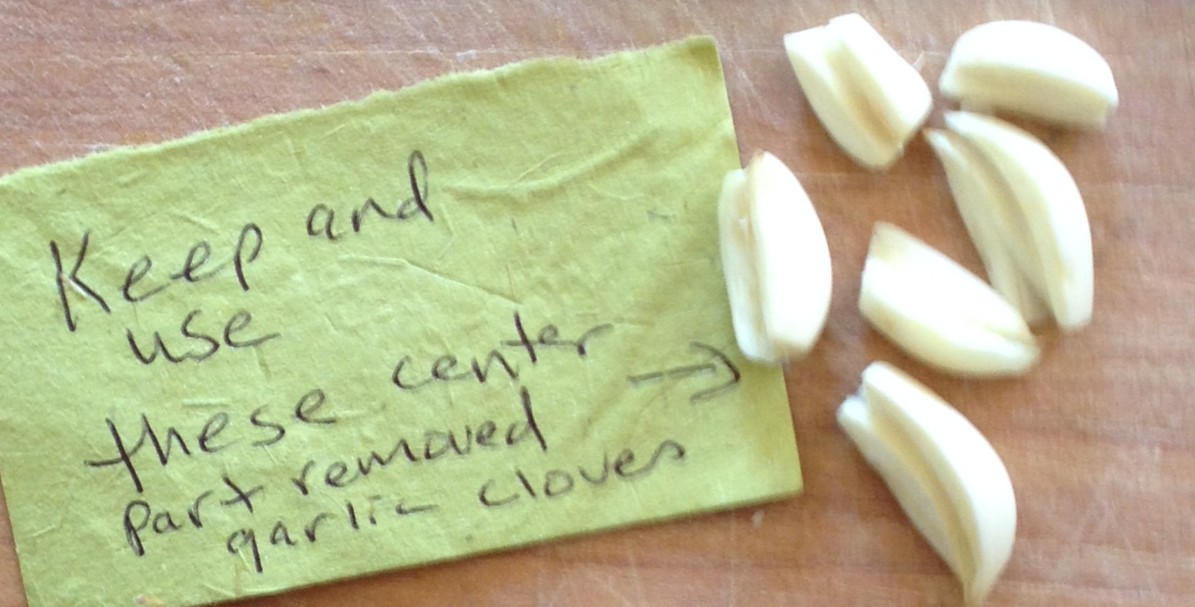
  5. more garlic than you think you need (at least one whole bulb) and prepare it correctly, by removing the centers. See instructions at the end.
  6. several stalks of celery
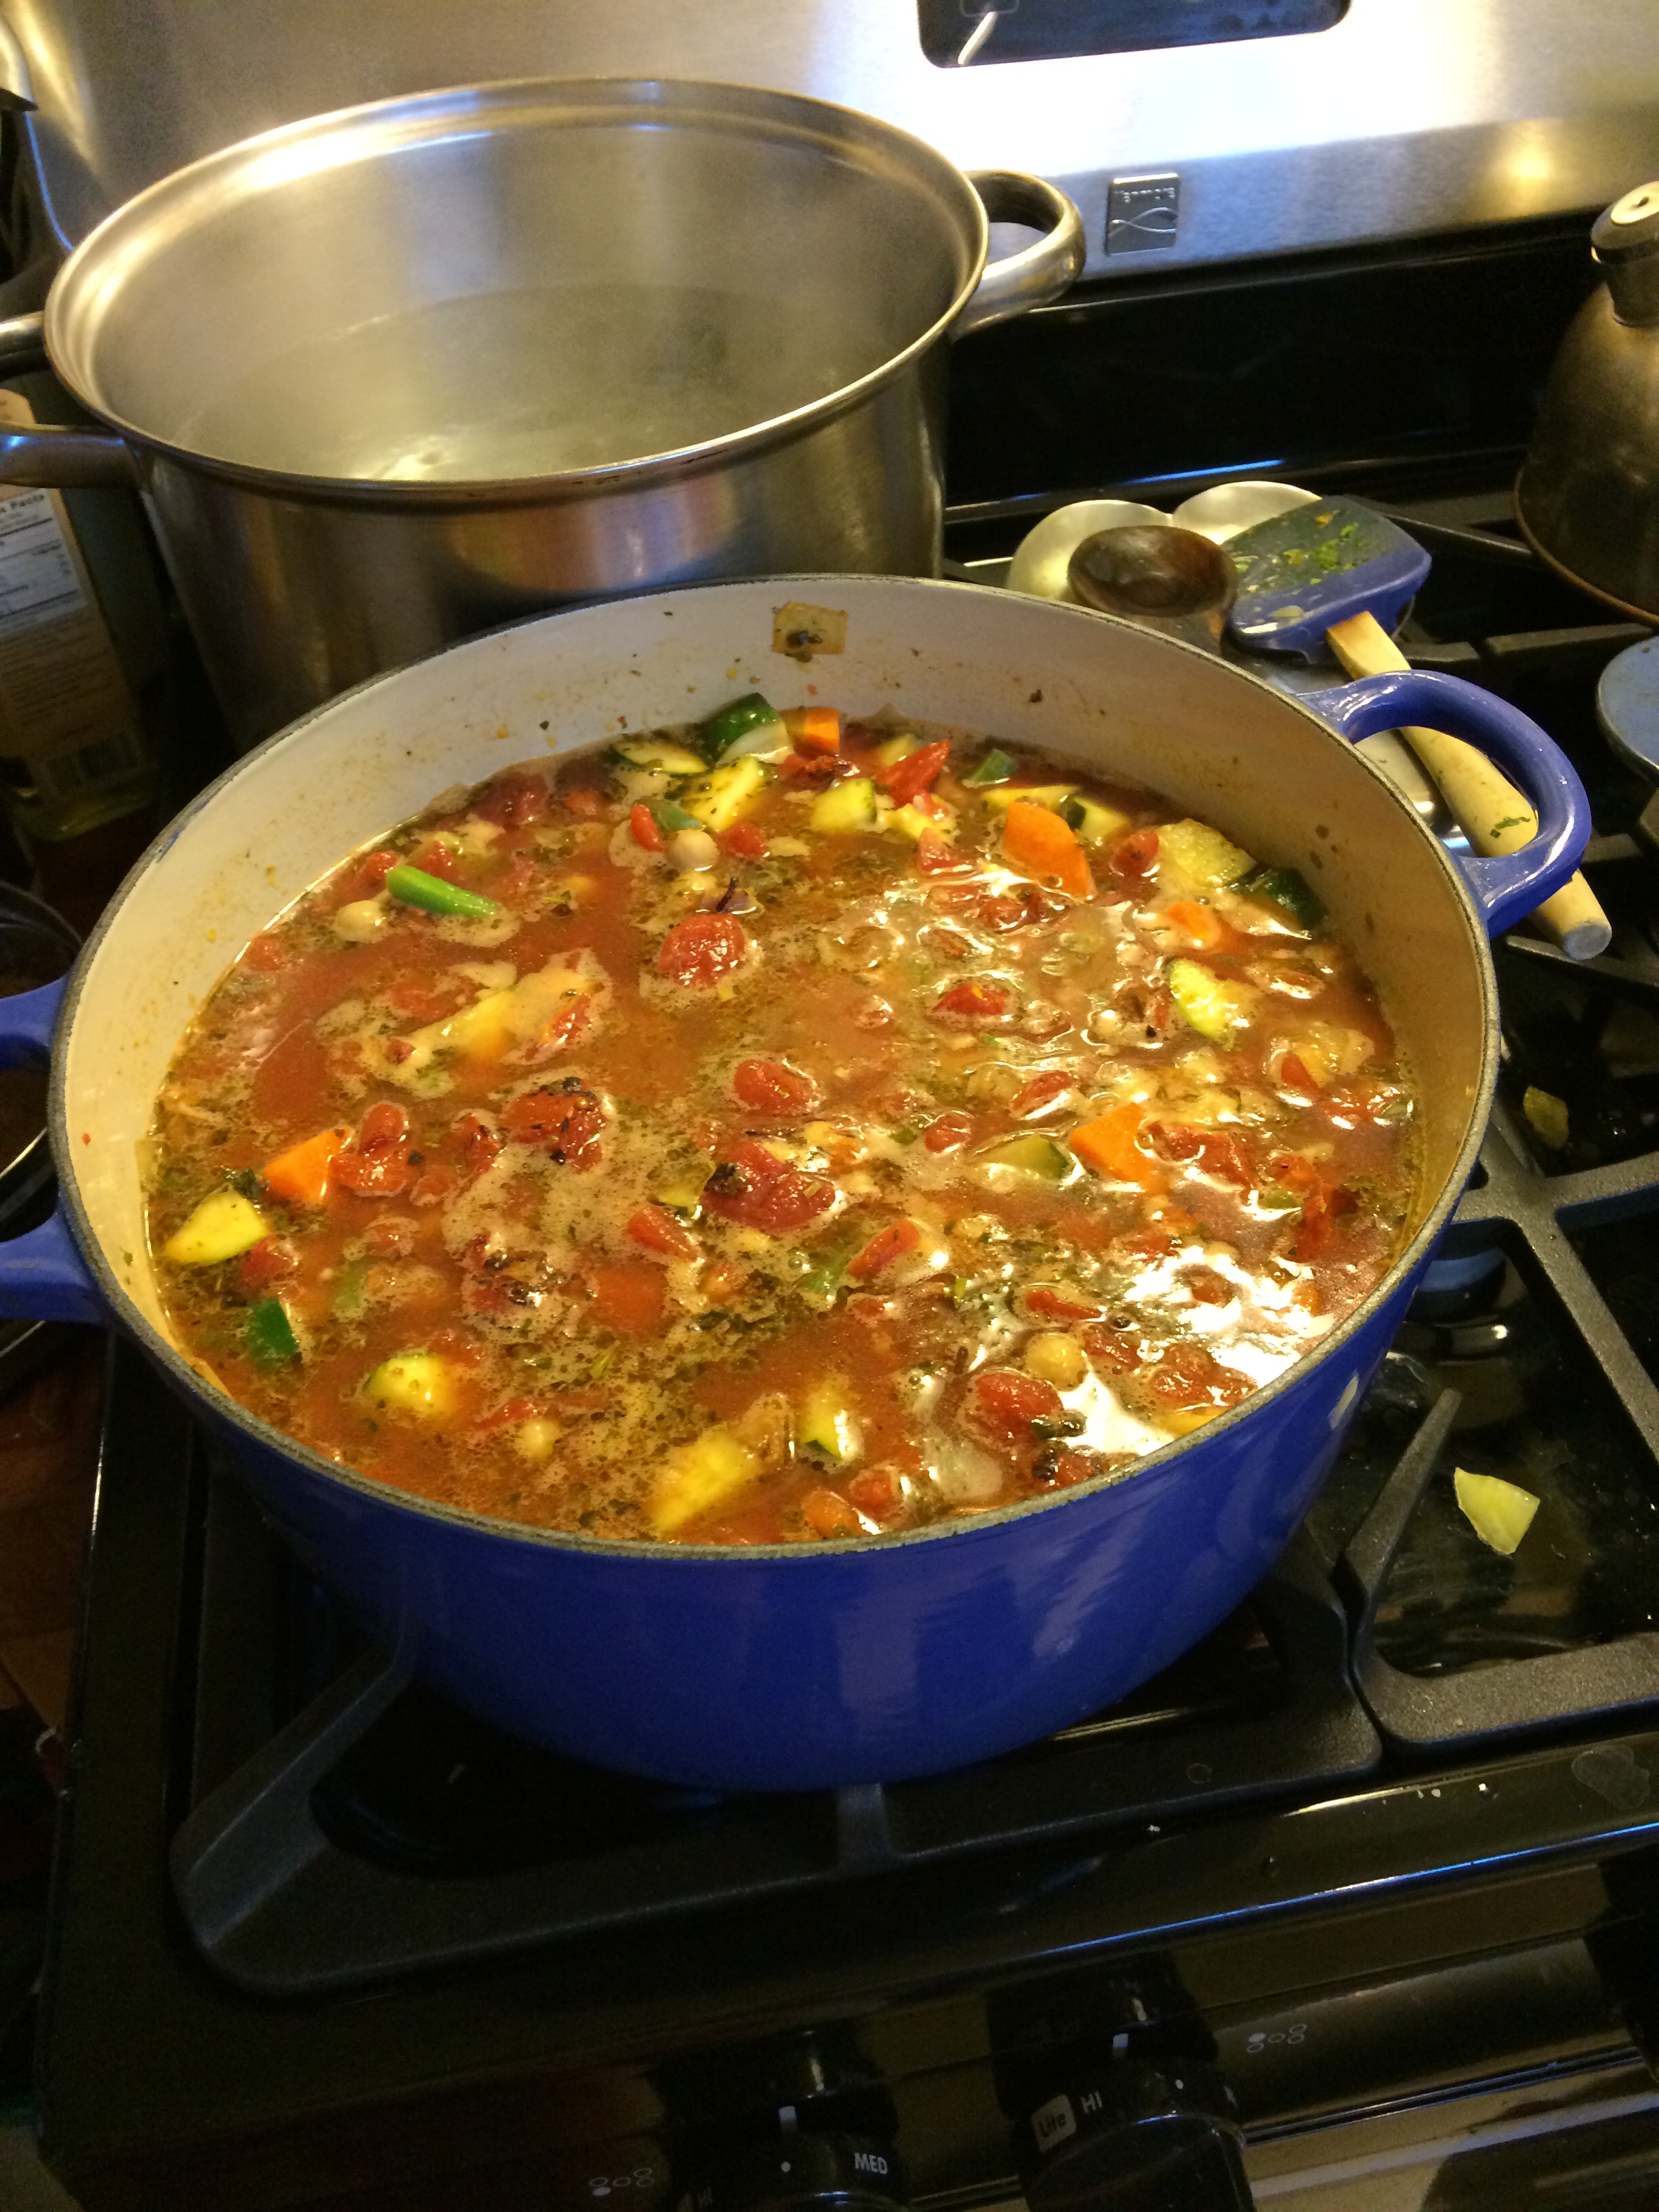
  7. two to four quarts or more of canned tomatoes with their juice (yours preferably) or if you have to use canned tomatoes, use Muir Glen’s Fire-Roasted whole or diced tomatoes and a jar or so of tomato sauce
  8. freshly chopped herbs: oregano, thyme, and parsley. If you have to use dried herbs, use fresher ones, this means not the ones sitting in your cabinets for three years! Buy in the bulk section when you can for dried herbs, the turn over is much greater there, so they are fresher.
  9. good salt (see Let’s Talk Salt)
  10. coarse ground black or white pepper (some folks cannot abide black pepper, but most folks can handle the white pepper)
  11. cayenne to taste (optional for folks who cannot handle spice)
  12. red wine 1/4 to 1/2 cup (the better the wine, the better the soup, you can drink the rest of the wine with your dinner). If you live in Humboldt County, where I do, you can always check out Bob’s Picks in the wine section at  the Northcoast Co-op. He has excellent taste and the wines he picks are often not too pricey and they taste great.
  13. balsamic vinegar 1/4 cup or less (not flavored or thick syrup balsamic, just basic balsamic vinegar)
  14. two to three cups cooked beans, garbanzo, cannelloni, white, fava, whatever beans you want. I always do garbanzo beans and usually a white or Lima or cannelloni bean as well. I use Westbrae Natural canned beans if I am not cooking the beans from scratch.
  15. Parmesan or Asiago cheese or some other nice strong cheese to add as a garnish if you aren’t making this for vegans. If you are doing a vegan version, don’t add the cheese.
  16. a bag of cooked noodles (gluten full or gluten free). This is optional. I don’t eat a lot of gluten and don’t like the gluten free stuff too much, so I just enjoy the soup minus noodles. Kids love noodles and if you throw the noodles in to their bowls, not into the soup base, and cover them with all the veggies and soup, this is one way to get them to eat some veggies!

Okay, with all those ingredients, surely something magnificent should be the result, and it is. This is actually a very easy soup to make. Just sauté up the  onions first for ten minutes with the white pepper or black pepper in the good olive oil, then add chopped carrots and celery, sauté those up for another five to ten minutes. Medium heat for the duration of soup cooking, until the end.

Throw in the fresh herbs and the zucchini and the garlic and the first teaspoon or so of good salt. After a few minutes add the wine, and then add the tomato sauce and tomatoes. You can cook this for an hour or more, then add the beans and cook another hour or so. Add the balsamic vinegar when you add the beans, also the cayenne and more salt. You can cook this soup for hours if you want, the veggies get pretty soft though and the beans can break down if you cook it for too long. On the other hand, the flavors blend really well the longer you cook it. This is something you have to discover on your own. I generally plan on this soup taking at least two hours to prepare and cook/simmer. I have let it simmer on low for another hour or two. Do not cook it on medium for more than an hour or two. Once the ingredients have all had a chance to hang out together, put it on simmer and do something else. I don’t cover this soup, either, I love the smell it makes and so does everyone who walks in the door!

Right before you are ready to eat, if you are making noodles to add to the soup, make sure you have a pot of boiling salted water ready to put the noodles in. Noodles generally only take five to ten minutes, if they are fresher, to cook. Once they are strained and done, toss them lightly with olive oil so they don’t stick. Keep them in a covered bowl or in the original pot you cooked them in, so they stay warm. Another trick with noodles, when you are NOT making macaroni and cheese, is to rinse them with VERY hot water once you strain them. This removes the starch that makes them sticky. I only do this with regular noodles, not with rice or other kinds of pasta, which is more delicate.

The only other thing you need with this meal is a green salad and some bread, if you are doing the gluten route. Otherwise, it is a meal in itself. Oh, yeah, don’t forget the glass of good red wine or for those who don’t consume alcohol, just enjoy the soup!

Garlic Center Removing Instructions: All centers of garlic bulbs should be removed. They are bitter, older and not healthy to eat. If you take the time to remove the centers from your garlic bulbs, everyone eating your food will be happier. The only time I do not remove the centers of garlic is if I am roasting whole garlic or using very fresh, young garlic that has no visible discoloration or center part. Folks who cannot eat garlic, can and do eat food I cook with garlic and they do not have the same problems they normally do when eating garlic not prepared this way. The centers are the problem!

Discard, Dont Use!Keep and Use

Eggplant Parmesan, Maren Frank Style!

Plated Eggplant Parmesan with fresh pasta and green beans.

This recipe is based on years of experimentation and work by Kevin’s mother Maren, it far exceeds any pallid imitations or pretenders you might have encountered previously. I always double this recipe, but I’m giving you the smaller amount instructions here. If you double this recipe you will end up with the two large pans and one smaller one that you see at the end of this post. I don’t think it’s worth doing this recipe for a small amount. You can always invite the neighbors over. Also, this dish gets better as it sits, so left-overs are Divine.

  1. Four regular eggplants, not the Japanese ones (picked according to Nicole’s instructions; click on this link to my Iranian Eggplant post to see the correct way to pick eggplants)
  2.  Good Salt for eggplants (Kosher probably best, but Himalayan Pink okay as well, see Let’s Talk Salt)
  3. Egg/Flour mixture: 2 large eggs or 3 small ones, 2–3 tablespoons of flour, ¼ cup of water, a dash of garlic salt or powder, fresh or parsley chopped very fine or dried parsley and some white pepper also
  4. Cheese: 2–3 blocks of part–skim, low fat or whole, never fat–free mozzarella, ½ cup or more of grated Parmesan cheese

Olive Oil: Option A: about a pint of good olive oil; Option B: use two good nonstick pans, you will then use less than a pint of good olive oil. I sometimes mix a little sunflower oil or canola oil in this, but the olive oil really makes it taste better.

Tomato Sauce:

A pot of warm tomato sauce (see Sapta Rachel’s Best Tomato Sauce prepared a day or two ahead or add another several hours of prep time, prior to beginning to make this dish). If you are doing my sauce, do not put fresh basil in it, use a little dried oregano, this dish doesn’t do well with fresh basil in the sauce. If you have to use prepared tomato sauce, the final outcome will reflect your choice. Maren recommends Prego, and only Prego, if you don’t have me handy or if you didn’t take the time to make my sauce, shame on you! I prefer organic sauces so I use Muir Glen or a locally made one from the Italian deli in our neighborhood. The fresher the better.

Breading:

One container of Contadina or Progresso Italian Flavored Bread Crumbs (don’t try other fancy, organic ones unless you are sure they have the same weight and consistency as these). We have tried the other kinds and been upset by the results. Since this recipe is a three to five hour effort depending on if you have helpers, it is not worth making a mistake. Follow our instructions and you will be pleased, stray from this path and feel the ache in your back and the frustration of a lot of time spent to yield something that isn’t that great.

Optional: Sauté up some mushrooms in butter, garlic, salt, pepper and parsley to use in one of the layers, or to serve on the side.

What you will need that isn’t a specific food item:

  1. Two large Baking Sheets
  2. Two large non–stick frying pans or two well–seasoned cast iron frying pans or one of each
  3. Two large casserole dishes
  4. Lots of clean counter space (see the Ten Commandments of Nicole’s Kitchen)
  5. An apron
  6. A sous–chef and a clean–up crew (these last two are highly recommended, if you can’t do this dish with a helper, make sure you have some good red wine handy to fortify yourself with ½ way through)
My super sous-chef Issac Frank, showing off his bear-paw hands, really good for frying and chopping and hand-holding too. Photo by Shakia Spink

Peel eggplants, slice into ¼ inch round slices. Place a layer of paper towels on your baking sheet. Put a layer of the sliced eggplant down, sprinkle very lightly with salt. Put another layer of paper towels on top of these and repeat this whole process until you have used all your eggplant slices. Make sure you put a final paper towel on the top, then put the other baking sheet on top of all of this, weigh it down with your large cast pan or several heavy cans of food. The object here is to help drain the eggplants of extra water, the lightly salted layers release their water out into the paper towels and the weighting down further encourages this process. This must sit for at least ½ hour, during which time you will prepare the following:

Egg/Flour mixture: in a small covered jar, shake the ¼ cup of water and flour together so they are well combined. Beat eggs in a shallow dish or bowl. Add the flour water and mix, add white pepper, and garlic and parsley. In another shallow dish pour a small amount of breadcrumbs, if you pour a lot in, they goop up and get clumpy, which is not what you want. You want a light layer of bread crumbs.

Turn your oven onto 350° at this point.

After the ½ hour has passed, remove the top weights from over your eggplant layers and pat the top layer with paper towel.

You will need a couple of plates or platter to put the breaded eggplant on. We recommend arranging your counter space in a kind of assembly line. Eggplants, then egg mix, then bread crumbs, then plates.

egg, flour, herbs and water mixture for coating eggplant
2015-02-03 15.32.57
small amount of bread crumbs to coat eggplant after it has been in the egg mixture
2015-02-03 15.33.04
plate getting loaded up with eggplant rounds for frying

Dip each eggplant slice in the egg mixture, then in the breadcrumbs so that it coats on both sides, place on your dish. Continue on ad–infinitum, until all the eggplant slices have been dipped and coated.

Now, over to the stove we go. Have your baking sheets clean and on hand to receive the fried eggplant. Take a deep breath or two. Pour olive oil into your pans, less for non–stick, more for other kinds, you need to cover the bottom of your pan and then have some extra, if you use a good amount, you won’t have to add oil in later to a smoking hot pan. Once the oil is hot, not smoking, it should be on a medium setting, fill each pan with the eggplant. Cook these a few minutes on each side, so that they brown a little.

Frying eggplant rounds in olive oil, the brownish red color is what you want. Once browned on both sides place on baking sheet for 20 minutes.

You don’t want them to burn, PAY ATTENTION! Remove from stove and layer onto baking sheets. Once you have filled up a baking sheet, repeat frying procedure with remaining eggplant. This method allows you to use less oil, which makes a difference. Bake in the oven for about 20 minutes. Remove the baking sheets from the oven and put the baked eggplant rounds on fresh paper towels over cooking racks or grates, this step helps get rid of extra oil. You can layer paper towels and cooked eggplant onto a plate as well, if you don’t have cooking racks or grates.

Have grated or shredded cheese in a separate bowl and the Parmesan cheese also in a separate bag, bowl or container.

Now we are back to the assembly line process again. Assemble the Eggplant Parmesan in the following manner. Put a small amount of sauce on the bottom of your pan, just a little bit. Then you will put one layer of eggplant on the bottom of the casserole dish.

sauce on bottom, first layer of eggplant rounds

Now, take several spoons of the sauce and spread it lightly over the top of each eggplant slice, don’t pour a large amount. You want the end result to be moist, but not runny.

sauce on top of first layer of eggplant rounds

Sprinkle a generous amount of the grated mozzarella over this, then sprinkle a little bit of the Parmesan cheese over this, then repeat the whole procedure, don’t do more than two full layers per casserole, because you don’t want a gooey oven mess.

cheeses on top of first layer of eggplant rounds and sauce. Next step is to repeat the whole process.

If you are into the mushrooms, you can insert the sautéed mushrooms after the first layer of eggplant, before the cheese. Your final layer, must always be the cheese. Use a little more Parmesan on the final layer. If you use too much this dish will be too salty and you’ll be sad.

Put them in the oven and bake for 45 minutes or more until the cheese is starting to get brownish. Remove from the oven. You are done! Except for the clean up which will take at least an hour or two. This dish is really only made for those your truly love, or those you are hoping to have love you for the rest of your life!

The finished masterpieces!

Applesauce and Hanukkah!

Peeled and Sliced apples cooking in applejuice.
Peeled and Sliced Apples cooking in apple-juice.

Perfect applesauce is not hard to make. Mine is sugar free as well. The apples are sweet enough, especially if you cook them in pure apple-juice (organic, unfiltered) or apple-cider (unsweetened). The thing is, like most of my recipes, time is the crucial ingredient. It takes a few hours, really to make applesauce, at least two. It’s a process. First you need to peel lots of apples, why bother making fresh applesauce if you are only making a little bit? It keeps for a while, you can give it away or you can preserve it. However you do it, it’s worth making a significant amount.

I have an old fashioned apple-corer/peeler that is hand held. This makes my apple-peeling and coring much easier. But you still have to navigate the stray peels and parts that don’t come off. Or you can just peel by knife. I like to have help when I am doing this job, so it goes quicker, and also because having help in the kitchen is the way to go.

I put enough juice in the pot to almost cover the apples, a little less or more, won’t make a big difference. You do want enough liquid though. I cook on a medium-low heat, uncovered for a long time, stirring frequently until there are no recognizable apple pieces and it gets very broken down and looks like brown mush. It’s done then. I put a dash of salt, just a dash and sometimes add a 1/2 teaspoon of vanilla as well, (optional).

Applesauce, of course, is the perfect complement to Latkes (potato pancakes) for Hanukkah. It’s best to make the applesauce a day or two ahead, because making and cooking the Latkes is time-consuming and messy (see my gluten-free Latke Recipe). You can enjoy applesauce all year round though. I don’t think using old apples is always the best. I use different apples based on who has dropped off a bag of them at my house, or what I find in the stores. This batch, photographed above, was made with Fuji apples, and it came out great.

I’ve used “applesauce” apples, meaning they were the rejects or less than appealing looking apples. Using older apples often means you have to cut out a lot of bad parts. I am not a fan of using less than excellent ingredients in what I cook. You can make good applesauce with funky apples, but you can make great applesauce with good apples as well. That said, making applesauce with older apples is a good way to use an apple that is no longer appealing to eat fresh. I would prefer if you used an older apple in a crisp or something because the crisp has sugar and butter and oats also happening and the apple is part of the story, not the WHOLE story. Apples are the WHOLE story when you are making my applesauce. Please, do NOT add other things to my applesauce recipe, if you do, then it is no longer my version. Lots of people like combination applesauce versions; peach/apple, apple/cranberry, apple/pear etc.. I think those are fine, but this is not the recipe for those, since I’ve never made those. I am a purist in certain things. I guess applesauce is one of those things!

Applesauce is also a really good first food to give someone after surgery, once they’ve been cleared for that kind of food, or for folks who are feeling under the weather. Serve it warm, not cold, it makes a person feel better. It is for sure a comfort food. See my Surgery Support: Pre and Post Lists for Optimal Recoveryand the other fabulous thing about making your own applesauce is how your home smells while it is cooking, Absolutely AMAZING!!!!!

Enjoy your applesauce and check out my Latke Recipe also, Happy First Day of Hannukkah/Channukah/Chanukkah/Hanukkah (however you choose to spell it!)

Latkes, Latkes, Latkes: How to Make them, How to Eat them, How to Survive them!

Naja Luz Tepe’s plate with one of my Ladino Latkes, and Nicole’s Home-made Applesauce

How to Make Them:

There are as many ways to make Latkes, as there are Jewish homes. Everyone has their own style and preferences. Here is my Ladino Latke Recipe

  1. Yukon gold or russet potatoes (8-10)
  2. 1-2 yellow or white onions
  3. 5-10 garlic cloves pressed (always remove the centers)
  4. a good handful of parsley, chopped up
  5. 2-3 carrots
  6. juice of 1-2 lemons
  7. salt & pepper to taste (a goodly amount)
  8. lots of eggs (7-10)
  9. A cup or more of Matzah meal which I prefer to flour
  10. lots and lots of sunflower oil or canola oil or schmaltz (oy vey!)
  11. Fresh thyme
  12. Freshly ground turmeric root
  13. Feta cheese (optional, but I highly recommend)
  14. Aloe Vera juice and ice-water on hand for when you burn yourself, and you will probably burn yourself, I do and I’m a seasoned pro!

So, I hand grate a lot of potatoes, uggghhh! It takes a long time and you have to be careful not to get your fingers grated in the process. I have made them with a food processor, but I have to tell you, the grater gets the potatoes thinner and into smaller pieces that cook quicker and absorb slightly less oil. You can make your own decision about this. I never bother peeling the potatoes, but I do clean them really well and remove any bad spots. Use a big bowl for this. I have also experimented with grating them into water and straining them. I’ve concluded that this particular idea is just one more step in a long and intense process, and it doesn’t seem to make any real difference. So, I no longer do it. I just grate them into a big bowl and try and pour out as much of the potato juice as I can.

I add the juice of one or two lemons, depending on how many potatoes I’m using, and stir that up, then I grate two or three carrots. The ratio of carrot to potato should be 1:3. So, one carrot for every three potatoes, for the non-math oriented folks. Since I am one of those kinds of people, it’s always a good idea to repeat myself when numbers are involved. You may have noticed, I rarely give exact amounts or numbers of things in my recipes. My apologies, I just don’t do numbers very much or very well. It’s an organic kind of thing in my kitchen with amounts shifting all the time.

I throw in some chopped parsley, fresh thyme and freshly pressed garlic (remember to remove the center parts, see Esti’s Parsley Sauce for pictures), lots of salt and pepper and then about 7-10 eggs and a bunch of larger crumbles of feta. If you are making these gluten-free, then you are done with the batter. If you want to add some Matzo Meal or flour then go ahead and put some of that in. I’ve made latkes so many different ways. I have not yet experimented with coconut flour or almond flour to see how that works. I often just go flour-less, since so many folks are not eating wheat or gluten these days.

You then will need three frying pans, four is too many to manage. If you use only one or two, good for you, it will take you another hour to be done, but you probably won’t burn yourself and need the aloe. Since I am always making these for a crowd, I am the three and sometimes four frying pan kind of woman. You can use any oil you want, but this recipe is about frying things in hot OIL.

Oil-rich foods are traditional for this time of year and this holiday because they are an additional way to get oil into our celebrations. The oil connects us to the miracle of the sacred oil lasting for eight days in the re-dedication of the Temple that is part of our traditional Hanukkah story. So, frying foods in oil and having lots of oil is just part of the holiday. I alternate between sunflower oil and coconut oil, depending on which I am more in the mood for. Both flavors are good.

Heat the oil to medium high, you can turn it down once you get going, but it needs to be pretty hot. Have lots of pot holders on hand and dishtowels on hand. Have two or more trays in the oven with cooling racks over them so you can put finished latkes on the rack and let the extra grease drip onto the pan below. Keep the oven on 250º so the latkes you’ve made stay warm, while you keep frying the rest of them.

This is the tricky part and the time-consuming part and the get yourself burned part. I wish I could say there was another way to do this, but basically, it’s a labor of love or love of tradition or some form of craziness. Take a slotted spoon, or a 1/2 cup measure and ladle the latke batter into three or four patties in the hot oil. Let them cook for a good five minutes or more per side, depending on the thickness. Smush them down so they are flatter after you turn them. I sometimes turn them too soon and then they are not golden brown and so I have to fry them on that side again.

The speed of this process and the timing are pretty hard to get down perfectly. It’s sort of a dance between flipping, checking, frying, ladling and then putting them on the trays in the oven so they stay warm until you are done. If you want to be just a servant to your guests, you can omit the keeping them warm in the oven part and just fry them and then dish them out. People always say they only want one or two, but end up eating four or more. I promise you they will eat more than they say they will. There’s just something deeply compelling about a latke, cooked properly and served hot.

How to Eat Them:

You can serve them with applesauce (see my recipe) and sour-cream, with Esti’s Parsley Sauce and Greek yogurt, with hot-sauce of your choosing, with whatever condiments you like. There will rarely be left-overs, but if there are, they are good with eggs the next morning.

Apparently, if you cool the potatoes the night before, by putting them in the fridge, they cook better. This is the tip I got from the appliance repair man who was over at our house this morning. I cannot verify this, but am putting it in as a tip that may prove to be true. I only make these ONCE a year and last night was the night, so my testing this particular theory will have to wait. You can let me know if it makes a difference for your latke frying.

How to Survive Them:

To survive Latkes, only eat them one of the nights of Hanukkah, not all eight! Or make sure you eat lots of bitter greens (like mustard greens) or radishes, daikon is my favorite, and lots of green salads as well. This is the secret to making your tummy happy with vegetables and flavors that compliment the fat-oil zone you get into this time of year by over-eating latkes. You can also substitute yams for the potatoes, but those are very different tasting, and still need to be cooked in lots of oil.

Also, if you want a different/alternative Hanukkah story, check out my Midrash, The Woman Whose Pockets Gave Light.

Happy Hanukkah!

Stuffed Squash Instead of Turkey or with it–as you prefer!

Not my recipe, but I am traveling and don't have a picture of this dish. This one looks close to mine though.
This picture is not my recipe, but I am traveling and don’t have a picture of this dish on hand. This one looks close to mine though.

This recipe is the result of trying to make something vegetarian and vegan for various members of my family over the years around Thanksgiving. I wanted something complex and that takes time, not as much as a turkey does, but still, not simple, something special so they feel included in the festivity. This recipe is the result of that and I have made it vegan many times for when I have vegan guests. It does take some time and has lots of ingredients, so don’t try to do this at the last-minute.

  1. anywhere from 3–5 delicata or 1-2 other larger squashes like butternut or acorn or red kuri or hokkaido
  2. 3–5 celery stalks or fennel stalks or a combination of both (chopped in long thin sections lengthwise and then into tiny chunks)
  3. 1–2 onions (chopped finely)
  4. ½–1 cup of chopped in small to tiny pieces of dried apricots, prunes, nectarines or other dried fruit (you can do a combo, or just one)
  5. 1-2 cups of finely chopped shiitake or other wonderful mushrooms
  6. 2–5 tablespoons of butter (or olive oil for the vegans)
  7. Omit this ingredient if you are doing gluten-free or use gluten-free bread instead, but this recipe is fine without bread (see ingredient 8, below). 1–2 cups of stale or older dried bread chopped up tiny (by hand or in a food processor) or toast up some bread & chop into tiny chunks
  8. (optional) 1 cup or more of cooked quinoa, barley or wild rice can be used instead of the bread crumbs. Don’t do bread and grain, use one or the other or neither.
  9. 1 cup or more of almonds coarsely chopped
  10. 1–2 apples cut up into tiny pieces, with the skins on, you can use Asian Pears instead or pears or some combination of apples and pears
  11. 3–5 leaves of freshly chopped sage, if you have it, otherwise a dash of dried
  12. 1/2 cup or more of cooking sherry (I prefer the really good stuff, not the cheap kinds, but even a cheap cooking sherry will do)
  13. 1 cup or more of roasted root vegetable or other vegetable stock, apricot juice (for a very sweet stuffing) or water
  14. ground white pepper to taste
  15. salt to taste
  16. dashes of dried marjoram, oregano and/or savory to taste
  17. dash of mace or nutmeg if you want that flavor (some do, some don’t)
  18. fresh feta (sheep or goat milk preferred by Nicole) obviously don’t add this ingredient if you are making this for vegans.

The first step is to bake the squashes while they are whole. I really do not like working with raw squash. You can easily cut yourself if you are not adept in the kitchen or with cutting raw squash. They are large, bumpy, hard and complicated to work with raw. If you cook them first and let them cool down a little bit they are a hundred times easier to work with. So, cook them first in the morning or something, this part is easy. Preheat the oven to 375º. Wash the outside of the squashes and while they are still wet, pour a little oil into your hands and rub around the squash. You are giving them an oil rub. Place them on a baking sheet with the stems up or on the side, do not puncture them. Cook for 20–40 minutes depending on the squash and the number of them on a baking dish. When they are pretty soft, but not all the way cooked, take them out of the oven.

If you didn’t do this step hours ahead of time, then leave your oven on, but reduce heat to 350º. While the squashes were in the oven, you should have been preparing the stuffing. If you did this step hours ahead of time, then start preparing the stuffing part now.

The key here is your preparation ahead of time, before you start cooking ingredients together it is best to have everything chopped up and in small bowls or piles on hand, so you can add the ingredients when you need to. In a large heavy–duty frying pan or cast iron frying pan heat the butter or the oil. When it is warm (almost brown for butter, just hot for oil) throw in your onions and sauté for 10 minutes or if you have lots of time and are doing this ahead of time, go ahead and carmelize them, which means cooking them on medium to low heat for at least 30-50 minutes with a lid and stirring frequently. It’s okay to just cook them for the shorter time, I give you permission, if you are in a hurry to just sauté them for the shorter time.

Add in the celery and the mushrooms and the fresh herbs, sauté for five minutes, add the apples, nuts, dried fruit, sherry and ½ cup or so of water or vegetable stock, mix it all up cook for a minute or so, then add the bread crumbs. You may need to add more cooking sherry or water if this is sticking to the bottom of the pan. You can also add more butter or more oil. Taste often and adjust your spices.

At this point your squashes will have had time to cool down. Cut the delicatas or butternuts in half lengthwise (this should be easy, now that they are cooked), remove seeds. For the other kinds that are more pumpkin or rounder shaped, cut a circle around the stem and take the top off and remove the seeds with a spoon. In a nice baking dish, place your squash halves or whole rounds and then ladle the stuffing into them, pack the stuff in.

You can add a drop of butter or oil to the top of each for more richness or not. I also put fresh sheep or goat milk feta on top of mine, which I think makes this recipe, but my husband cannot abide goat or sheep milk feta. His squashes don’t ever get that on them and he still loves them. So, do whichever appeals to you. Put them back in the oven and cook for another 15-20 minutes or so. If you have left over stuffing put it in a small well oiled baking dish and bake it with the squash. I make this dish at Thanksgiving or whenever I get fresh squashes from my local CSA (Community Supported Agriculture) farm Redwood Roots. This is a great alternative to a Turkey for your vegetarians. I also recommend doing this a day before any large feast, so you can work on other dishes if you are making a variety of foods. This dish keeps well overnight and you can just warm these up in the oven before serving them.

Another variation that looks close to how mine do.